| Common Scan Parameters
|


|
|
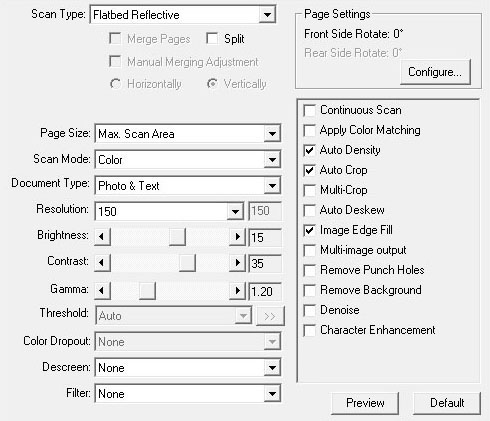
| The following describes the scan parameters available to every button setting window:
|
|
|
|
|
|
|
|
| Scan Type
|
| Tells the scanner the method you will use to scan documents or images. The following options are available from the drop-down menu:
|
| · | Flatbed Reflective-- Use this setting to scan normal sheets of paper or any non-transparent material directly from the scanner glass.
|
|
|
|
|
| Split
|
| Tick the check box of Split, a scanned image will be split in two equal halves and each equal half is called a page.
|
|
|
| Check the radio button of Horizontally and the scanned image can be split horizontally. Check the radio button of Vertically and the scanned image can be split vertically. You can make the selection of Horizontally or Vertically only when the function of Split is enabled.
|
|
|
|
|
| Page Size
|
| Adjusts this setting to tell the scanner the size of paper to scan. Popular paper sizes have been preset in the drop-down menu. If you select Custom... from the drop-down list, a Custom Page Size dialog box opens and you may tailor the page size for documents frequently scanned.
|
|
|
| Name:
|
| Give a name to this customized page size. After you configure the page size and click the OK button, this name will appear in the Page Size drop-down list.
|
|
|
| Unit:
|
| Defines the measurement unit for the page size.
|
|
|
| Width, Height:
|
| Specifies the exact width and height of the page area.
|
|
|
| Paper Alignment:
|
| This setting tells the scanner how you place the document into the scanner.
|
|
|
| When Flatbed Reflective is selected as the Scan Type:
|
| · | Upper Left: Place a document face down onto the scanner glass and align the document top with the arrow on the reference mark.
|
| · | Center: Align the center top of the document with the center of scanner glass's right side.
|
|
|
|
|
|
| Scan Mode
|
| Tells the scanner what type of documents you are scanning. The following options are available from the drop-down menu:
|
| · | Black & White-- scans in black and white and is suitable for scanning text.
|
| · | Grayscale-- scans in 256 shades of gray, giving black and white images depth and shadow.
|
| · | Color-- scans in millions of colors (24-bit) but takes up a lot of memory.
|
| · | Auto-- use this setting if you want the scanner to detect the scan mode automatically. (This function may or may not be available depending on the scanner model you purchase.)
|
|
|
|
|
| Document Type
|
| This function allows you to select the type of content on the scanned documents for better scanning results. The following options are available from the drop-down menu:
|
| · | Custom-- Use this setting to process the scanned document when other image enhancement functions are adjusted. This option allows you to customize the image setting parameters for your current needs. If you select this option and don't modify any image setting, the previous image settings will be applied.
|
| · | Default-- Use this setting to process the scanned document by the default values.
|
| · | Photo-- Use this setting to process the document contains mostly photographs. This feature is not available when Black & White is selected as Scan Mode.
|
| · | Photo & Text-- Use this setting to process the document contains a mix of graphics and texts.
|
| · | Text-- Use this setting to process the document contains mostly texts. This setting is available only when Black & White is selected as Scan Mode.
|
|
|
| Resolution
|
| Resolution is measured in dots per inch (dpi). The higher the resolution, the more detailed the image and the more memory and drive space the image will use.
|
|
|
| To conserve computer memory and still receive good image quality, we recommend the following settings.
|
|
|
|
|
|
|
|
|
| Brightness
|
| Raising the brightness increases the amount of white in an image, making it appear more washed out. Lowering the brightness may help you read light or faint text.
|
|
|
| You may adjust the brightness either way:
|
| · | Slide the thumb of the scroll bar to the right or left, which adds lightness or darkness to all colors in your image.
|
| · | Click the arrow signs on the right and left ends.
|
| The current value is shown to right of each scroll bar.
|
|
|
| Contrast
|
| The higher the contrast, the sharper the image. The lower the contrast, the more blurry an image will be.
|
|
|
| You may adjust the contrast either way:
|
| · | Slide the thumb of the scroll bar to the right or left, which raises or lowers the differences between light and dark colors in your image.
|
| · | Click the arrow signs on the right and left ends.
|
| The current value is shown to right of each scroll bar.
|
|
|
| This feature is not available when Black & White is selected as Scan Mode.
|
|
|
| Gamma
|
| Image Gamma is used to adjust the colors in the image that will be scanned into the computer. Gamma values are primarily a measure of the brightness of a color. The larger the gamma value, the brighter the color becomes.
|
|
|
| Do one of the following:
|
| · | Slide the thumb of the scroll bar to the right or left; or
|
| · | Click the arrow signs on the right and left ends.
|
| The current value is shown to right of the scroll bar.
|
|
|
| This feature is not available when Black & White is selected as Scan Mode.
|
|
|
| Threshold
|
Threshold sets the color level for converting an image to line art, which can adjust the quality of line art image or eliminate unwanted dots in the documents to improve OCR accuracy. This setting is available only when Black & White is selected as Scan Mode. Select the options from the drop-down list. Click  to open a dialog box where you may adjust the settings. to open a dialog box where you may adjust the settings.
|
|
|
| You may adjust the Threshold / Radius / Weight value either way:
|
| · | Slide the thumb of the scroll bar to the right or left to decrease or increase the value.
|
| · | Click the arrow signs on the right and left ends.
|
| The current value is shown to right of the scroll bar.
|
|
|
| Color Dropout
|
| Color Dropout allows you to remove a color channel (Red, Green or Blue) while scanning. This feature is available only when Black & White or Grayscale is selected as Scan Mode.
|
|
|
| For example, if your original document contains blue texts or a blue stamp (e.g., a bill or invoice) and you want to discard it from your image, you may select Blue Channel from the drop-down list box
|
|
|
| Descreen
|
| Descreen applies filtering to images that contain moiré patterns (or herringbone). A moiré pattern is created from scanning pictures in magazines, or printed material that use color dithering. The descreen filter is not needed when scanning original photographs or black and white images and text, but is recommended when scanning any printed color graphics, such as a page from a magazine, in order to remove the unsightly interference patterns which may occur.
|
|
|
| This feature is not available when Black & White is selected as Scan Mode.
|
|
|
|
|
| Filter
|
| Filters help you improve your scans by allowing you to sharpen images as well as remove excessive dots and distortion.
|
|
|
| The following options are available from the drop-down list:
|
| · | None-- Applies no filter in the scanned image.
|
| · | Average-- Determines the medium depth of an image and averages adjacent pixels to make images appear softer.
|
| · | Blur-- Dulls the edges within an image and decreases the contrast by making dark edges lighter and light edges darker.
|
| · | Blur More-- Adds additional blurring.
|
| · | Sharpen-- Allows you to sharpen the edges within an image by making the edges in an image more distinct. The Sharpen filter also increases contrast by making dark edges darker and surrounding light edges lighter.
|
| · | Sharpen More-- Adds additional sharpening.
|
| · | Unsharpen-- Sharpens the edges in an image to remove the blurriness.
|
|
|
| This setting is not available when Black & White is selected as Scan Mode.
|
|
|
|
|
| Page Settings
|
Clicking  opens the Page Settings page. opens the Page Settings page.
|
|
|
| Auto Rotate
|
| Tick the check box of Auto Rotate, the document image you scanned will be automatically rotated and straightened.
|
|
|
| · |  0°-- Clicking this button keeps the image at its original orientation. 0°-- Clicking this button keeps the image at its original orientation.
|
| · |  90º Right-- Clicking this button turns the image clockwise by 90º. 90º Right-- Clicking this button turns the image clockwise by 90º.
|
| · |  180º-- Clicking this button turns the image by 180º. 180º-- Clicking this button turns the image by 180º.
|
| · |  90º Left-- Clicking this button turns the image counterclockwise by 90º. 90º Left-- Clicking this button turns the image counterclockwise by 90º.
|
|
|
|
|
| Continuous Scan
|
| Check this option if you want to scan multiple pages successively to the same destination. After the document is scanned, a dialog will pop up asking you if you will put in more paper to continue scanning, or if you want to end the scan.
|
|
|
|
|
| Apply Color Matching
|
| Different types of devices reproduce different ranges of colors (or color gamut). For example, you may have noticed the colors of the scanned image displayed on your monitor and on the paper printed from your printer are different.
|
|
|
| Color Matching allows you to get consistent color between input and output devices (e.g., scanner, monitor, printer). It works by embedding a color profile to your image files. Each different device displays colors according to this profile and therefore results in consistent color appearance among all devices.
|
|
|
| Ticking this check box if you want DocAction to apply the built-in color sRGB profile to the scanned images. This feature is available only when Color is selected as Scan Mode.
|
|
|
| Auto Density
|
| Auto Density defines the lightest and darkest pixels in each channel as white and black and then redistributes the intermediate pixel values proportionately. Checking this box automatically adjusts the Histogram, to make the scanned image clearer. It does this by increasing the difference between color tones.
|
|
|
| In general, the Auto Density feature gives good results when a simple contrast adjustment is needed to enhance an image with an average distribution of pixel values.
|
|
|
| This feature is not available when Black & White is selected as Scan Mode.
|
|
|
| Auto Crop
|
| Alternatively you may tick this check box to have DocAction automatically identify the dimensions of the image you scanned and crop around the edges. The crop shape will be a square or rectangle and it will not trace the edges of oddly-shaped images. This command can be useful when scanning smaller images such as photographs.
|
|
|
| Multi-Crop (This function may or may not be available depending on the scanner model you purchase.)
|
| When you scan two or more small items at the same time using the flatbed scanner, you may tick this check box to perform multi-crop automatically. The program will identify each individual item and generate separate scanned image files. The scanned items must be placed separately and no two items are sticking together on the scanner glass. Place all small items on the scanner's flatbed with a slight gap between them for best scanning results.
|
|
|
|
|
| Auto Deskew
|
| Tick this check box if you want DocAction to automatically straighten the skewed image after auto crop is done.
|
|
|
| If the placed image is too slanted (>10°), the Auto Deskew function will not recognize the skewed image(s).
|
|
|
|
|
| Image Edge Fill
|
| Tick the check box of Image Edge Fill, the edge of scanned image would be filled.
|
|
|
|
|
| Multi-image output (This function may or may not be available depending on the scanner model you purchase.)
|
| Tick the check box if you want DocAction to output multiple images after the scan process is finished. Depending on the scan settings, you may choose to output up to three multiple images in Color, Grayscale and B/W by only one scan.
|
|
|
|
|
| Remove Punch Holes (This function may or may not be available depending on the scanner model you purchase.)
|
| Tick the check box of Remove Punch Holes, the hole marks aligned along with the edge of the scanned document will be removed after auto crop is done. The function will work for the document with single background color.
|
|
|
|
|
| Remove Background
|
| Tick this check box to remove the colored background of the scanned documents.
|
|
|
|
|
| Denoise
|
| Tick this check box to remove noises from the scanned images.
|
|
|
|
|
| Character Enhancement
|
| Tick this check box to enhance text characters in the scanned documents. This feature is not available when Black & White is selected as Scan Mode.
|
|
|
|
|
| Global Settings
|
| Click the Global settings button to configure settings of Image Enhancement, Multi-image output (This function may or may not be available depending on the scanner model you purchase.), Image Edge Fill, Remove Punch Holes (This function may or may not be available depending on the scanner model you purchase.), Scan continuously, Split and General.
|
|
|
| Image Enhancement
|
| You may set the conditions to enhance the scanned images in this page.
|
|
|
| Remove Background
|
| This feature is used to adjust the remove condition of colored background. The higher the value, the greater the effect will be. Slide the thumb of the scroll bar to the right or left, and the current value is shown above the scroll bar.
|
|
|
| Denoise
|
| This feature is used to adjust the reduce condition of noises. The higher the value, the more noises will be reduced. Slide the thumb of the scroll bar to the right or left, and the current value is shown to right of the scroll bar.
|
|
|
| Character Enhancement
|
| This feature is used to adjust the enhancement value of text characters. The higher the value, the sharper the text character will be. Slide the thumb of the scroll bar to the right or left, and the current value is shown to right of the scroll bar.
|
|
|
| Multi-image output (This function may or may not be available depending on the scanner model you purchase.)
|
| If you select Color as Scan Mode, you may tick the check boxes of Gray and B/W to output color, grayscale and B/W images by only one scan.
|
|
|
| If you select Color as Scan Mode, you may tick the check box of Gray to output color and grayscale images by only one scan.
|
|
|
| If you select Gray as Scan Mode, you may tick the check box of B/W to output grayscale and B/W images by only one scan.
|
|
|
| If you select B/W as Scan Mode, only B/W image will be generated by one scan.
|
|
|
| You may select the desired resolution from the dpi drop-down list. If you select Custom from the drop-down list, please set the resolution dpi.
|
|
|
| Image Edge Fill
|
When you scan by the Color Mode, clicking  button would allow you to choose the color you prefer for edge fill. button would allow you to choose the color you prefer for edge fill.
|
| When you scan by the Grayscale Mode, clicking button would allow you to adjust the color you prefer for edge fill.
|
When you scan by the BW mode, you may click  button for white edge fill or button for white edge fill or  button for black edge fill. button for black edge fill.
|
|
|
| · | Auto border filled with auto fill color
|
| When the scanned document size is smaller than the selected page size, select this option to automatically detect the document edge in the scanned image and fill the background color around the document edge after the document is scanned.
|
|
|
| · | Custom
|
| Select this option to configure custom options.
|
|
|
| · | Inward Fill: Select this option to fill the selected color inside the edge of the selected page size.
|
|
|
| · | Outward Fill: Select this option to fill the selected color outside the edge of the selected page size.
|
Tick the check box of All sides match, the widths of four sides would be set to be the same. You may adjust the width by clicking  buttons. If you do not tick this check box, then you can adjust the width of each side individually. buttons. If you do not tick this check box, then you can adjust the width of each side individually.
|
|
|
| Remove Punch Holes (This function may or may not be available depending on the scanner model you purchase.)
|
| Color of the Background Paper
|
| If you select this option, punch hole marks will be filled with the background color of the scanned document.
|
|
|
| Custom
|
| If you select this option, punch hole marks will be filled with the selected color.
|
| When you scan by the Color Mode, clicking button would allow you to choose the desired color to remove the punch hole marks.
|
| When you scan by the Grayscale Mode, clicking button would allow you to choose the desired color to remove the punch hole marks.
|
| When you scan by the B/W Mode, punch hole marks will be filled with white color if you click button, or punch hole marks will be filled with black color if you click button.
|
|
|
| Scan continuously
|
You may adjust the time interval by clicking  buttons. buttons.
|
|
|
| Split
|
| You may set the number by clicking the up or down arrows to split an image into several equal parts. Each equal part can be saved as an image.
|
|
|
| Enable specify split sequence
|
| Tick this check box to specify the image output order of each equal part.
|
|
|
| Specify split sequence
|
| Select the options to specify the image output order. You can specify the horizontal and vertical output orders of images scanned in simplex mode. The numbers in the illustration figure show the current image output order of each equal part. To configure the desired output order, clicking on the number to clear the existing output order, and then clicking on each equal part to specify the output order.
|
|
|
| Prompt dialog to show high resolution and large size scan reminder
|
| Tick this check box to show a warning dialog when users scan high resolution and large size documents.
|
|
|
|
|
| Preview
|
| By clicking on the Preview button, you can scan the source document into the preview window within DocAction interface. Documents or images that are previewed will be displayed here. The previewed image gives you an idea of how a document or image will look after it is scanned.
|
|
|
|
|
| Default
|
| Clicking the Default button on the lower right corner revert the settings to its original values and discard all adjustments you have made.
|
|
|
|
|

